Email sequences are also known as Autoresponders. This is probably a term you’ve heard already. For the uninitiated it means an email campaign that is triggered automatically based on user actions. So for example if someone signs up for your product you then send them a series of articles about how to use that product. This can be a very powerful tool for email marketers to engage with their audience. Before I get into how to create and use these it’s worth talking about ‘Bacn’ (and not the delicious kind you might have for breakfast). Bacn email is a bit like spam, however it’s not unsolicited. It is instead email that you gave your permission for at some point but no longer want. This has become a big problem, with hotmail reporting 75% of all spam complaints to actually be bacn.
So with this in mind we need to be careful of how we set up and use email sequences. There are, however, big benefits when they are used properly (for both you and your audience). For example you can tailor campaigns as they are in action, actually making them more engaging for your audience. So the campaign can become more fluid, with users being added or dropped out of sequences depending on actions. Different contacts can be sent different emails depending on how they reacted to previous emails. This means your audience receives increasingly relevant content whilst those who are not engaged can be dropped out the sequence altogether.
Here’s a few of the things you can do using sequences and some of the more advanced techniques:
- Tailor campaigns in action by sending different content to people depending on how they reacted to previous content
- When they become disengaged with you email marketing, remove them from the campaign before you become bacn
- Split test new products and services through your email list by sending out different content to different segments of your audience
- Send out a offers based on audience behaviour. For example if someone opens a newsletter about “prom dresses” and clicks on the link to the article then maybe you should send them a coupon for 10% off prom dresses in your store
- Tailor offers across your audience depending on what content they have previously responded to, only sending offers to those who have shown interest
So let’s get started by taking a look at how to build a basic email sequence. For example if someone signs up to an email list, you then send them a short sequence of emails with more information about your product. You might want to finish that sequence with a money off coupon for your product. To demonstrate how to set this up we’ve chosen Mailchimp as it’s what Wordtracker has historically used and Mailflow, which we have since helped develop.
First off let’s have a look how to do that in Mailchimp:
- Go to the automation tab and select “Create Automation Workflow”
- Choose which list to send the campaign to
- You now need to choose which type of autoresponder you want. Mailchimp allow you to choose from a variety of options, depending on your account and campaign settings:

- We’re going to select “Educate subscribers” as we’re going to be sending out a sequence of emails designed to tell people about the product.
- Now it’s time to configure the workflow:
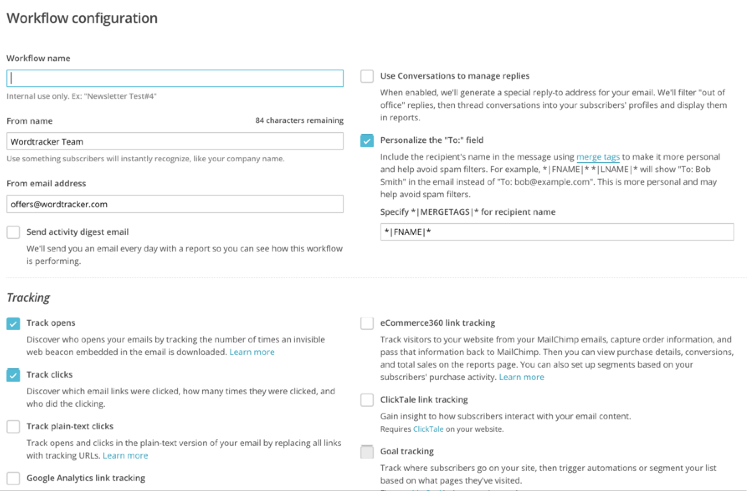
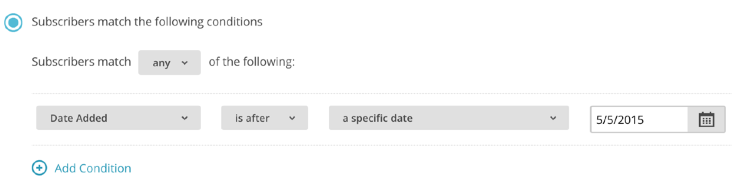
Unless you have any specific needs I would leave these options as is, other than naming the flow. You also may need to customise the merge tag settings. - Now you need to choose your segmentation options, for this test I’m going to choose “when subscribers match the following conditions” and set it up like this, where the date chosen is today’s date:
- You will now be prompted to add emails to the sequence. I want to add three emails, so I chose the “add one email” option as I can always add more later.
- Now you can choose the email you want to send, clicking on this will allow you to select your template and edit your email
- Add additional steps by clicking “add email”
- Adjust the timings between the emails in your sequence using the “change delay” option
- Once you’re happy with the sequence and have built the emails you want click next in the bottom right.
- Review your choices and options then click confirm. That’s it, your first autoresponder is now running.
Now here’s how it’s done in Mailflow:
- Go to the “flows” tab and select new flow, naming your flow when prompted
- Click on “Flow targeting” and select “has tag” to target by sign up form (or any other tag)
- Add a stage by clicking “Add stage”.
- Click on “Select who to target” You can choose to refine your targeting further on an email by basis, or just select “all contacts in flow” to leave it as is.
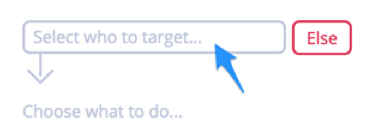
- Hit “Choose what to do” the select the “send email” option to open the wysiwyg where you can choose your template and write your email
- Add a new stage and repeat for each email. Adjust the timing for each stage as you do so.
- Click “Start flow” in the top right and you are done
In both these examples we’ve worked through creating the same sequence. You can of course easily extend this with further emails. However with basic sequences like these you want to keep them short. This minimises the chances of creating bacn emails. Ideally though, this should be used as a jumping off point as there is so much more you can do.
Try modifying your sequence to remove people from your campaign who are not engaged. Opens can be used for this, but they are not a perfect metric as those who do not load images will not show as an open. Conversely some clients will load the email in preview which will count as an open even if it’s not properly read. This means clicks are the best metric for engagement as they are more reliable. It also shows a much higher level of engagement than just opening the email (some might argue this is more about the subject line than the content).
Also adjust the content people are sent within your sequence depending on the emails they have engaged with previously. Maybe some subjects are more engaging to some recipients. These can be separated out and content created to specifically target them. You may want to go as far as creating offers and landing pages designed around the audience groups you create. In this way you are segmenting your audience based on expressed preferences which can then be used to engage and convert much more effectively.
Please do watch out for the next article where we’ll be looking at how to set up some of these more advanced sequences. We’ll also be taking a look at some different email techniques such as split testing and how these can be achieved within different tool sets.
If you have any questions, or topics you would like to see covered then please drop a note in the comments.
