Twitter has become one of the most influential and biggest social networks on the planet, so whether you’re an individual or a business owner, it’s a great way to get involved in the web. Unfortunately, many who still don’t have a Twitter profile feel like it’s too late to bother or they’ve missed the boat. Fortunately, this is an untrue assumption.
If you don’t have a Twitter profile yet or aren’t sure where to begin, don’t sweat it. Setting up a Twitter profile and getting started is easy and doesn’t take more than five minutes.
How to Setup a Twitter Profile
1. Preparation. Preparing to setup a Twitter profile simply means have a few names you may want to use in mind and determine whether you’re going to set something up for your business or start by creating an individual account. It’s as easy as that.
2. Information and Creating Account. Click here and fill in information such as your name, email address, password, and username. Then click the big yellow button that says “Create my account.”
Note: If you type in a username and it’s already taken, you will be told right on the signup page. All you need to do is keep trying different usernames (or “handles”) until you find one that works. Twitter will even give you similar recommendations that are available, which you can see in the screenshot below. It’s also worth noting that if you choose something and decide later that you don’t like it, you’re still able to change it at a later time.

3. Confirm. Confirm your Twitter account by responding to the email you will receive. Simply press “Confirm your account now” and you’re set to go.
Note: Twitter will then walk you through the steps of making your profile more exciting and really getting started with all that the network has to offer. You’ll be taken straight to the pages that tell you what to do next.
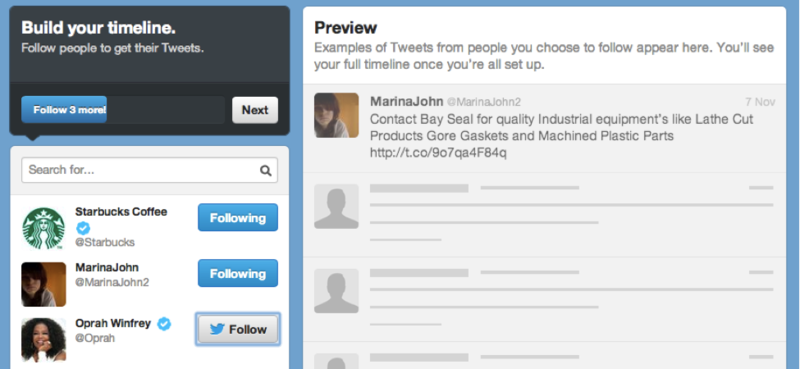
4. Follow. Twitter prompts you to start following 5 people. You can search for friends (even with their full, real name) or choose from one of the options Twitter recommends just until you get going. Below is an example screenshot:
5. Follow Some More. You’ll be prompted to follow 5 more people or brands. This is the step where I recommend following cool celebrities or companies (because the next step is all about your friends).
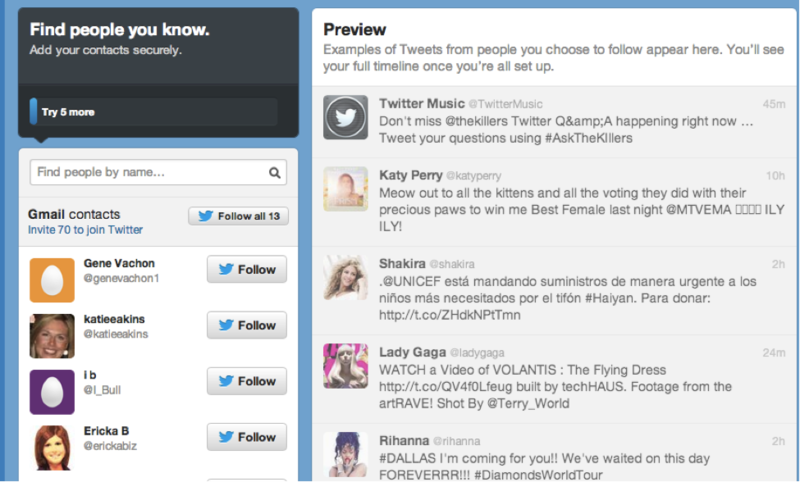
6. Find People You Know. You can type in people you know by name or search your contacts on Gmail, Yahoo, Hotmail, AOL, or all of the above. This means that Twitter will go through your email account and see who has a Twitter profile. Below is a screenshot example. As you can see, I have 13 Gmail contacts that have a Twitter account, and I can scroll down and see who those people are on the left hand side or follow them all at once. You also have the option to invite your other contacts (in this case 70) to Twitter; although this isn’t something beginners necessarily need to worry about right away:
Hint: If you’re working with a business or want to use your profile for business purposes only, try connecting this profile to your company email or email where you do all of your business. This will make it easy to connect with people you’ve spoken to in the past for business reasons.
7. Add Character. Add an image and create a small description of yourself to be showing on your Twitter profile. You have 160 characters available to create your description. You also have the opportunity to put one link on your Twitter profile that will show up right below your description, so put thought into the link you want to include. Businesses usually put a homepage link as well as individuals who are promoting a business, while individuals promoting themselves like to put a link to his/her LinkedIn profile.
Note: If you see an egg as a photo for yourself or for anyone else using Twitter, it means that he/she has not uploaded a profile picture yet.
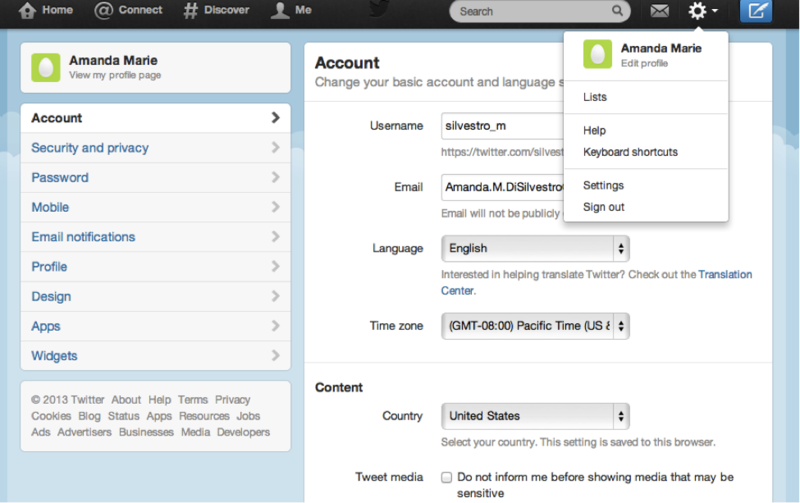
8. Visit Settings. Before you really get involved in using Twitter, make sure your settings are all correct. Check to make sure you have the Twitter handle you want (username), your email address is the one where you want to receive notifications, your description is correct, etc. You can always go back and revisit your settings page, but it’s a good idea to become familiar with it right off the bat. As you can see on the left hand side of the following screenshot, there are quite a few different things you can change.
Differences Between Setting Up a Profile for a Brand vs. Local Business vs. Individual
When it comes to setting up a Twitter profile, you will be faced with this inevitable question: Is there a difference that occurs when you setup a profile for a brand, a local business, or as an individual? When it comes to the actual setup, the answer is pretty much always a big NO (however optimization and strategy does change, which we’ll talk about in a future article).
Below are a few notes that help answer this question in detail:
Individual Profiles
An individual profile is the most common type of Twitter profile to setup. Even if you are not creating a profile for an individual—let’s say you are creating something for a brand or a local business—you can still setup an individual profile and just make the name the name of your company and have a picture of your logo.
The term “individual profile” is not used much in the Twitter world. An individual profile is just your normal Twitter profile that you’ll just call a “Twitter profile” (imagine that!). During setup, a profile is a profile no matter who is managing it.
Brand Profiles
When it comes to a brand profile, you have to first determine how many business Twitter accounts you want to have. Really large companies sometimes have different accounts for different departments, locations, and/or different products. For example, if your company offers women’s bridal gowns as well as men’s suits, you may want to have two different Twitter accounts because those are two different audiences. This would also help if you wanted to have someone who specializes in bridal gowns manage one account and someone else manage the other account so you know you’re having real professionals pushing out content.
Advertising on Twitter and working with what is called “promoted tweets” is also an option for businesses, so stay tuned for a detailed post on how to make it happen. If you can’t wait any longer, visit this link to learn more.
Local Company Profiles
A local company profile can be setup the same way that an individual profile is setup. You can think about how many Twitter accounts you need just as you would do with any brand account, but by and large setting up a local profile account on Twitter follows the exact same steps discussed above.
When to Post as an Individual and When to Post as Your Business
This is a question that depends completely on preference as well as the nature of your business and what you want from Twitter. As discussed above, some people want to create an individual profile specifically to share business-related content and make those relevant connections. If this is the case, post as an individual whenever your company shares content on its website or blog as well as whenever you’re reading something interesting about your industry. If you’re tweeting from a company website, do the same thing.
As far as when to post in terms of time of day, there are quite a few tools out there that can predict the best times for you to tweet during the week to reach the most people. In general, weekdays in the morning are great times to get some eyes on your posts.
You can read more about Twitter marketing here:
- Getting started with Twitter
- Building an engaged audience on Twitter
- Manage & analyze your Twitter account with the top Twitter tools
Meanwhile, are you following @Wordtracker yet?